Security roles define how a POS Staff member can use the POS Terminal software by enabling and disabling features for specific users. Each POS Staff member can have their own security role, or a group of POS users can share the same role.
For example, a basic roles would be Manager and Team Member, where a Manager would have access to all areas of the POS while the Team Member may be restricted to basic enter and management of sales.
This form allows you to edit the specific permissions for a POS User security role. Note: Only users who have been granted the Manage Security Roles application wide permission and the File > Application Settings Main Menu permission are able to access this form.
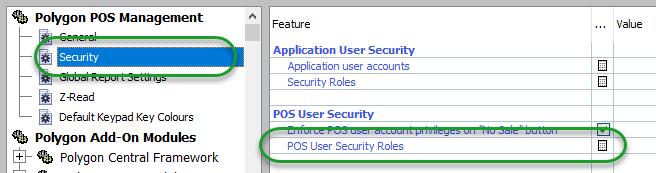
From Polygon POS Management, Access Application Settings by either, pressing "Ctrl + A", or, selecting File from the main menu, then selecting Application Settings, Access the POS Users Security Roles File by selecting Security from the left of the window, then clicking the Line Item icon
Then click the New button to create a new POS User Security Role, or, Highlight an existing POS User Security Role and click the Change button to modify the selected role.
|

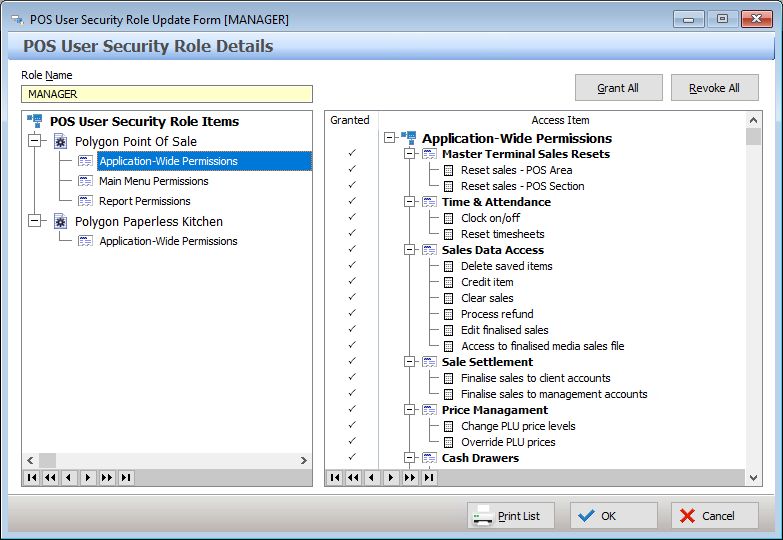
When creating a new POS User security role, begin by entering a Role Name at the top of the form. The role name will be used to identify this role when it is applied to POS user accounts.
Viewing Permissions
Permissions are grouped into sections which are selectable from the menu at the left of the screen. To view or modify the permissions for one of these sections, click on the section name at the left of the window (Permission sections are listed at the left and Identified with this group icon ![]() ). This will display all the permissions for this section in a list at the right of the form. A tick mark next to permission a permission indicates the permission has been granted to this role. To toggle whether a permission is granted or revoked, highlight the permission and press the Space Bar on your keyboard, this will toggle on or off the tick mark at the left of the item. Permissions listed at the right of the form grouped together with other similar permissions, permission groups are identified with the group icon
). This will display all the permissions for this section in a list at the right of the form. A tick mark next to permission a permission indicates the permission has been granted to this role. To toggle whether a permission is granted or revoked, highlight the permission and press the Space Bar on your keyboard, this will toggle on or off the tick mark at the left of the item. Permissions listed at the right of the form grouped together with other similar permissions, permission groups are identified with the group icon ![]() to grant or revoke all permissions within a group, highlight the group and press the Space Bar on your keyboard.
to grant or revoke all permissions within a group, highlight the group and press the Space Bar on your keyboard.
Grant All & Revoke All Buttons
Clicking the Grant All button or the Revoke All button will grant all permissions listed on the right or revoke all permissions listed on the right respectively. If you want to create a security role which has every permission enabled, remember to select each of the five permission sections at the left of the window and click the Grant All button for each set of permissions.
The permission groups are described below:
These options include functions of the POS that do not have a specific toolbar button or access point. Note: if these functions are accessed via a toolbar button, the POS User will also need access to the toolbar button in the Main Menu Permissions section. Master Terminal Sales Resets •Reset Sales (POS Area) •Reset Sales (POS Section) Time & Attendance •Clock on/off •Reset Timesheets •Edit Timesheets Sales Data Access •Delete Saved Item •Credit Item •Clear Sales •Clear Discretionary Service Charge •Process Refund •Edit Finalised Sales •Access to finalised media sales file Sale Settlement •Finalise sales to client accounts •Finalise sales to management accounts Price Management •Change PLU Price Levels •Override PLU prices Cash Drawers •Manage Cash Drawers •Open Cash Drawer •Perform Cash Clearances Application Data Access •Edit Table Floorplans •Set table balance limits •Set PLU quantities POS Terminal •Reassign master terminal •Exit the POS terminal •EFTPOS Control •Release locked sales records •Set listbox columns Keypad Button Security •Level 1 (highest) •Level 2 •Level 3 •Set online mode |
These options will allow the POS User to access the functions (if assigned in the Application Wide Permissions) contained within the toolbar buttons. Toolbar •System Settings •Admin •Manage POS Health Status |
This is where you can determine which reports the POS Users are able to access. Note: The POS User must also have access to the Admin option in the Main Menu Permissions section. The report section at POS is subject to continual enhancement - at the time of publication the list of reports is: Trading Reports •POS Area Z-Read •POS Section Z-Read •POS Terminal Media •Item Report •Sales by Hour •Sales by 1/2 Hour •Food & Beverage Sales Report •Sales by PLU Class Staff Reports •Staff Sales •Staff Media Summary •Staff Tips •Time & Attendance Totals |
This will determine if the POS User password will be accepted when accessing the System Settings for KMS devices. •System Settings |
Assigning Security Roles to POS Staff Accounts - Once a security role has been created, it can be assigned to one or more POS Staff from the POS Staff Details form.