The Polygon Promo player enables promotional content (images, videos, web pages or PDF documents) to be presented to customers along alongside sale information and and loyalty account information. This information is displayed to customers using customer facing computer monitors. Promo player content and the data layout can be customised to work with many different screen sizes. Different content can be assigned to be displayed depending on the current mode of the POS terminal. The following POS terminal modes are available:
•Idle mode – When POS terminals are running the Promo Player but the POS terminals are not being used to record a sale.
•Sale Mode – When a customer purchase is being recorded
•Loyalty Mode – When a customer purchase is being recorded and a member’s loyalty card has been scanned.
The following two versions of the Promo Player are available:
•Basic Promo Player – This version of the promo player is included by default with Polygon POS Management for no additional cost. The standard version has a number of limitations. A maximum of 6 images to be used, the playmode can be assigned but no date/time scheduling options can be setup. When multiple Images are assigned to a Play mode, they will cycle with a delay of 10 seconds.
•Advanced Promo Player – This version is available to users who have purchased a Promo Player license. The Advanced Promo Player removes the limit on the how content items images can be setup. The Promo Player Playlists can be configured to display different content depending on the date, time of day or day of the week. The delay between images can be set to a value between 1 second and 60 seconds.
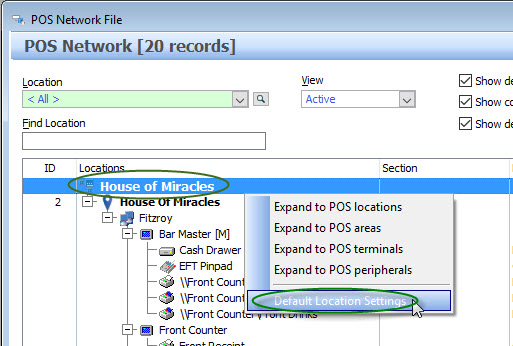
Follow these steps to enable the Promo Player: The Promo Player Features should be Enabled from the Default Location Settings Form. To do this: •Access the POS Networks File by clicking the POS Networks button on the POS Management toolbar •Open the Default Location Settings – To do this, right click on the topmost record in the hardware tree (which has this icon
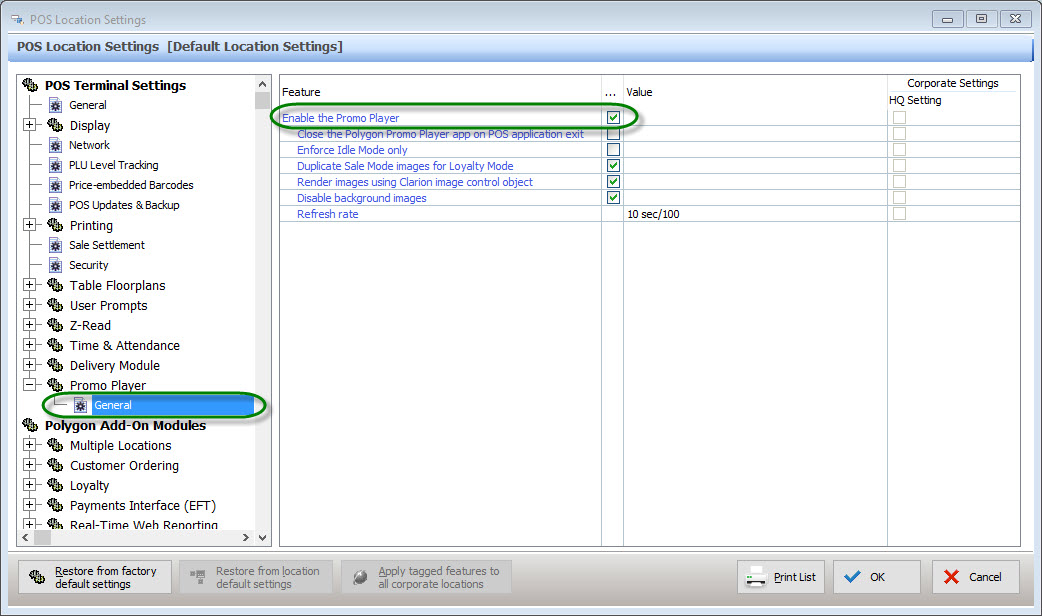
Accessing Default Location Settings •From the Default Location Settings form, expand the Promo Player settings Group (on the left of the form), then select “General”. Place a tick in the “Enable Promo Player” tick box. Then click “OK” to save this change. Note: The layout of the default location settings form varies depending on whether the licensed or unlicensed promo player is being used. A screenshot of each of these layouts is below.
Enabling the Basic Promo Player
Enabling the Advanced Promo Player - (Only Available to Users with a Promo Player License)
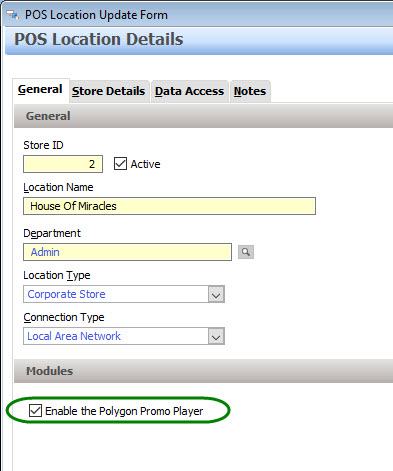
Promo Players Must be Enabled for each Location which will Use a Promo Player. To do this: •Access the POS Networks File by clicking the POS Networks button on the POS Management toolbar •Open each POS Location which will use a Promo Player Locations are identified with this icon - •Tick the “Enable the Polygon Promo Player” tick-box (under the Modules heading on the General tab) •Click OK to save this change
|

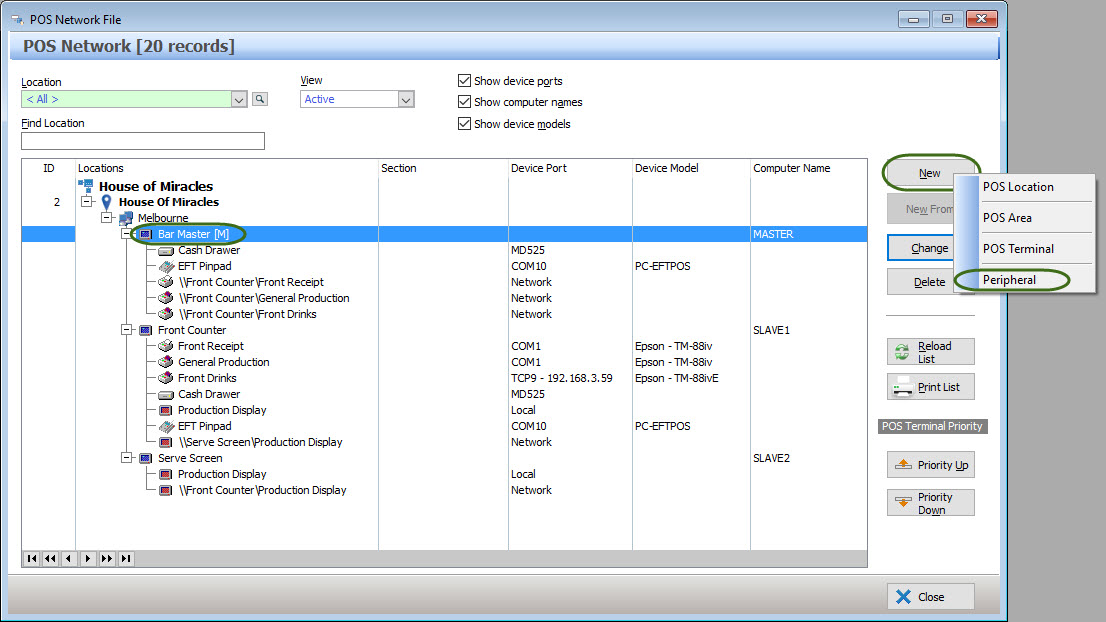
A promo player peripheral should be assigned to each POS terminal which will have a customer facing monitor attached. To do this: •Access the POS Networks File by clicking the POS Networks button on the POS Management toolbar •Select each POS Terminal which will have a customer facing monitor running a Promo Player. Then click the New button, select “Peripheral” from the pop-up menu. Terminals are identified with this icon
•From the POS Peripheral Details from, set the device type to “Promo Player”.
•The Target Content Monitor value identifies which monitor on the POS terminal will be used as the promo player display. This is normally monitor number 2. • Ticking the "Allow multiple player instances" tick box will allow you to configure more than one promo player monitor to be attached to this POS terminal. Note: The physical POS terminal hardware must have enough display connectors to attach multiple monitors. •Select the Background Layout Profile which matches the screen dimension which you will be using. The profile used will depending on the size and dimensions of the customer facing monitor which you will be using. If you are unsure which profile to use or if no profiles are available, please contact the Redcat support team for assistance. The Redcat support contact phone number is 1300 473 322 - then select option 3 for support. Alternately the Redcat Support team can be contacted by email here support@redcat.com.au •Click OK to save your changes.
|

BOH Users whom will be configuring Promo Player Playlists must be granted access to the “Promo Player Playlist” menu item for their security role. This role is located under the Polygon POS Management heading in the Main Menu Permissions section (shown below). For more information about configuring security accounts and roles, see section User Accounts File
|

|
The folder which contains content items for the promo player needs to be assigned from the POS Management Application Settings. The Promo Player Content Directory setting is accessible differently depending on whether you are using the Basic Promo Player or the Advanced Promo Player. •Begin by opening the Application Settings window from POS Management (Select File from the main menu, then select Application Settings) •Expand the Promo Player Settings Group, then select the General Item. •Click the Line Item button •Highlight the Folder which will be used to store Promo Player Content Items, then click the OK button. The screenshots below show how to access the Content Folder Setting when using the Basic Promo Player and the Advances Promo Player.
Basic Promo Player
Advanced Promo Player
|


Configuring a Promo Player Playlist
Once the Promo Player has been enabled and user permissions have been configured, a Promo Player Playlist can be configured. See section Promo Player Playlist File for more information about configuring a Promo Player Playlist.
After making a change to the Promo Player Playlist, Playlist Items or screen layout profile, remember to send an update to the FOH to apply these changes. When sending an update, •Tick the the "Promo Player Playlist" tick-box to update the promo player playlist and playlist items. •Tick the "Promo Player Layout Profiles" tick-box to update the promo player screen layout. This tick-box is used when setting up a new POS terminal or setting up a new Promo Player screen.
See section Sending POS Network Updates for more information about sending Updates to the FOH.
|
See Also:
Polygon POS Management > Promo Player
Getting Started with Polygon POS Management
POS Management > Application Settings