A facility is provided with the POS terminal which allows you to quickly check the system and hardware settings for a terminal, check settings which apply to the whole network of terminals, and to test local peripheral hardware such as a serial printer. These settings are primarily used by RedCat support staff. They are accessible from the Staff Log On page by clicking the System Settings button ![]() on the toolbar at the top of the screen. Some of the system settings span multiple pages which can be navigated by clicking the Previous Page and Next Page buttons at the top of the settings.
on the toolbar at the top of the screen. Some of the system settings span multiple pages which can be navigated by clicking the Previous Page and Next Page buttons at the top of the settings. ![]()
![]()

Internet Updates
If your POS Location has been assigned as an Internet Update location for the purposes of sending and receiving data between the Polygon POS Management PC and the terminals, this icon at the top of the POS Terminal Settings screen is activated.
Receiving Updates from Polygon POS Management
The Web icon is used to instruct the terminal to connect to the internet and retrieve any updates which may be waiting for the terminals. You will be prompted by the system to confirm your choice before the command is initialised.
Broadcasting Updates to the Terminal Network
The Update icon can be used to broadcast the last update retrieved from the internet to the other terminals in the network for that POS Location. Please note – this action is usually automatically instigated by the system, you will only need to do this if instructed by RedCat support staff.
POS Terminal Settings
To view this section select Terminal ID from the POS Terminal Settings section at the left of the form.
Terminal Identification This section shows the POS Location ID and name, the Terminal ID and Name. It displays the current path of the terminal files, the POS Area to which the terminal belongs and the Name and Path of the Master terminal in the area.
Backup Server The Backup section displays the name of the terminal designated as the backup server, the database path of the server, the frequency of the backup setting, and the time that the most recent back up was sent to the terminal. Terminal backup settings are set from the POS Area Details form. See Section Polygon POS Management > POS Network File > POS Area Details > General Tab
Updates Server (Pg2) This section displays the name of the master terminal that is currently sending updates to slave terminals, the database path that the updates are processed from, the frequency at which this terminal checks for updates, and the times that most recent update was sent and received.
Polygon Back Office Server Details (Pg2) This section displays where the Polygon Back Office database is installed and which department this terminal belongs to, if any.
|
This section displays a tree list which shows which peripherals are available to this terminal. To view this section select Peripherals from the POS Terminal Settings section at the left of the form.
|
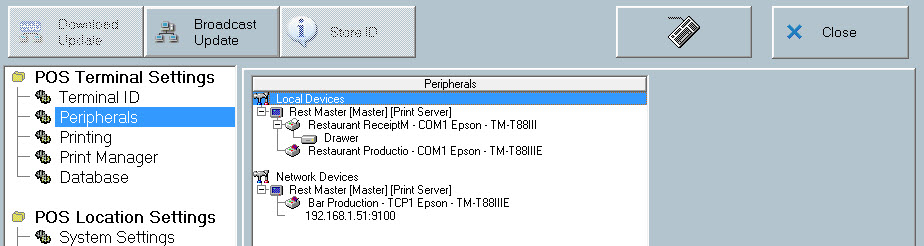
Print Server The computer designated as the Print Server is displayed, along with its database path. It also shows where print instructions from this terminal are spooled.
Production and Receipt Jobs This section shows which printing options have been selected for this terminal (and its printers) when configuring the system in the Location System Settings.
Note: The only setting which may be applied here is the instruction to the terminal to preview all receipt print jobs before printing. To enable this function, place a tick in the Print Receipt Preview box.
This setting is used if you wish to redirect printing to a printer on a particular COM port. This setting may be necessary if you have a printer that is not functioning.
Alternatively, if you have set up a single printer to perform as either multiple production or multiple receipt printers, whereby the printer is set up on a real and a virtual COM port, this is where you channel all print jobs to the correct printer. For example, if a Coffee Production printer is set up on COM 2 and a Cocktails Production printer on virtual COM 9, then select COM 2 from the drop down arrow next to the ‘Print all jobs on port:’ option. These two dockets will now print separately on the same printer, as all the print jobs sent to COM 9 and now being redirected to COM 2.
•To channel only production dockets to this printer, tick the Exclude Receipt Printers box. •To channel only receipt dockets to this printer, tick the Exclude Production Printers box.
Suspend Printing to Local Ports If production printing is enabled, the option to ‘Temporarily Hold Printing on Local Ports on this terminal’ is available to assist with printer downtime and maintenance. If the POS printers need to be switched off for any reason (change paper, change ribbon, clear paper jam etc) you need to instruct the system to ‘hold’ any information which is directed to that printer. This information will then be printed when the printer is once again on line. If you do not ‘hold’ the printing while the printer is switched off, any data sent to that printer may be lost.
See Also: Printer Redirection & Toggling ; Polygon POS Management > POS Networks File > POS Peripheral Details
|

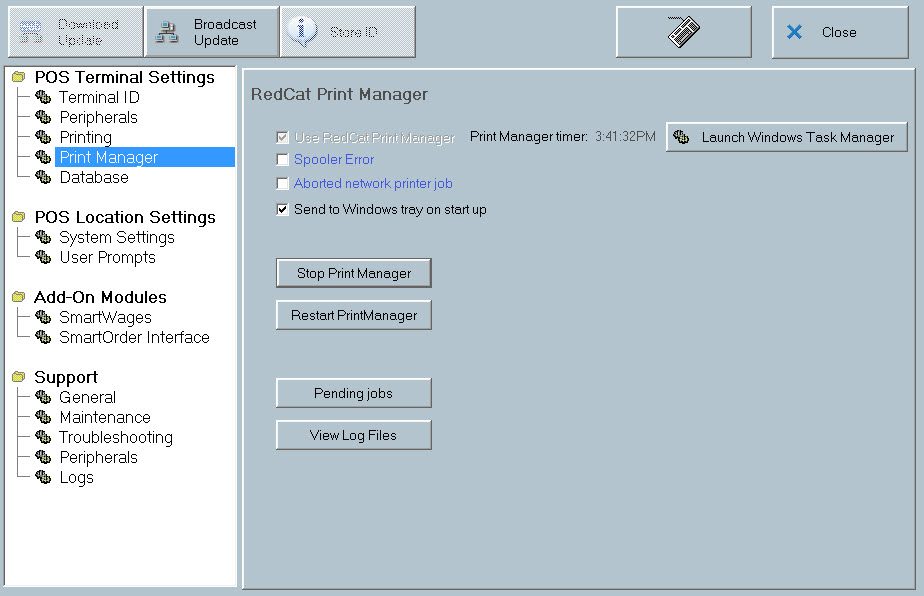
For clients with IP (network) production printers and receipt printers, the Print Manager application can be accessed with the POS Terminal system settings. Select System Settings icon from the tool bar and go to Print Manager in the left hand menu:
If you operate network printers on your system, it is important to know how the print manger application will operate on the print server terminal. Some points to note: •If you use Cross Area Printing, you will nominate which terminal acts as the print server. •If you don’t use Cross Area Printing, the master terminal will act as the print server. •The Print Manager application will be launched automatically and run in back ground mode on the print server terminal each time the terminal software is opened. •The Print Manager Application will close automatically when you exit the terminal software on the print server. Note: Print jobs sent by other terminals on the network to the print server, will only be directed to the network printers if the RedCat terminal software is successfully running on the server terminal. •The Stop Print Manager button will end the print manager application. It will not restart until the terminal software is launched again, or the restart button is pressed. •The Restart Print Manger button will close the application if it is running, and re-launch it, or launch the application if it has been stopped. •The Show Task Mgr button will launch the Windows task manager. This option should only be used if absolutely necessary, when Print Manager cannot be successfully restarted. Click the Processes tab within Task Manager. Highlight the print manager process shown as ‘RCSPOOLER.EXE’ and click End Task and OK. •The Pending Jobs button will display the Print Manager Pending Jobs form displays a list of pending print jobs. If the print manager is not running these jobs can be canceled from this list by highlighting the print job and clicking the Delete Selected button.
|
This section displays database statistics and database server information. Database statistics include the number of sales records, sales item records, media payment records, sales item records, z-read files in outbox, z-read files in z-backups folder.
|
POS Location Settings
These two sections of system settings are read-only at the POS terminal and are displayed for your information only. If you wish to change any of these settings, this is done from Polygon POS Management Location System Settings. See the section called Polygon POS Management > Location System Settings for further detail.
|
Support
Support sections of the POS System Settings file are intended for use by Redcat technicians and support staff, or under instruction from Redcat Help Desk.
See Also:
POS Terminal Redundancy and Recovery
Getting Started with Polygon POS Management
Getting Started with Polygon Back Office