|
Introduction
The Floorplan keypad is fully customisable and can be designed to give the user a visual representation of the actual floorplan.
Floorplan keypads or 'table maps' appear after the staff log-on page at the FOH and allow you to:
•Choose a table to enter a new sale against, view the items saved to that table, save additional items, or finalise the bill;
•View which tables are occupied and which are vacant;
•Move a customer account from one table to another;
•Merge the accounts of two tables.
From Polygon POS Management,
Select Keypads from the main menu and then select the Floorplan Keypads.
|

The Floorplan Details screen will be displayed:
•Use the drop down menu to choose the POS Locations this table map will be available to.
•Use the drop down menu to choose the correct POS Area.
•Select the Floor. Each POS area can have floorplans for a number of floors. The Previous Floor and Next Floor buttons are used to navigate between floors.
•Ticking the Production View tick box will display the Floorplan as it would appear on the POS terminal at the front-of-house.
•POS Area Section - Table objects can be assigned to a POS Area Section, so that sales entered on the table are tracked and reported as part of that Section. This filter can be used to display only the tables that have been assigned to the selected Section, or to display only tables that have not been assigned to a Section (by selecting <None>), or to display all tables (by selecting <All>).
NOTE: The POS Area Section filter must be set to <All> before you can create new objects or save changes to the Floorplan (by pressing OK).
•Display Outline - Some POS terminals run on smaller screen sizes (resolutions). If your POS terminals run at lower resolution an outline can be enabled to help make sure no objects go past the edge of the smaller screens. To view the usable area for screens running at lower resolution, select 800 by 600 pixels from the Display Outline list. To remove this outline, select 1024 by 768 pixels from this list.
If you wish to create your own custom shapes for your table map design you can use the Label, Rectangle or Circle buttons.
Tables & objects are created by:
•Click on the one of these buttons
•Hold down the left mouse button and drag. Release when size is correct.
After the size has been determined the Table Map Object Details form will be displayed. This form allows you to enter additional details about this table/object.
|
•Edit - To modify the details of a table/object click on the Edit button and then click on the table/object;
•Delete - To remove a table/object click on the Delete button and then click on the table/object;
•Copy - To copy a table map object, click on the Copy button, then click on the table/object and then click on the desired position of the new item;
•Move - To re-position a table/object, click on the Move button, then click on the table/object and then click on the desired position of the item;
Note: Two table map items cannot overlap.
•Resize - To adjust the size of a table/object, click on the Resize button and then click on the table/object and make the necessary change. |
To make designing a table map easier there are a number of pre-set table objects. These are accessed by clicking the Toolbar button at the top of the window. Toolbar items are split up into the following tabs - Tables, Kitchen & Bar, Equipment, Doors WC Cloak, Flooring and Auto-Populate (described below).
•Simply select the table object and then place in the desired position by clicking the mouse button. Two table map items cannot overlap. |
This feature is accessible by clicking on the Toolbar button at the top of the window, and then clicking on the Auto-Populate tab.
There are three keypads that can be automatically generated by the system; the Standard keypad, the Delivery Module - Pick up and Delivery Module - Delivery keypads. These keypads are described below:
Standard Keypad
This will generate a floorplan keypad containing a a grid of tables which can be automatically numbered in a horisontall or verticall order. The number of tables generated can be specified by changing the Number of Tables figure. The direction which tables are ordered horisontally or vertically by selecting the orientation under the Layout Strategy heading (shown below). By default the tables will be automatically assigned incrementing table numbers, but tables can be manually assigned numbers or names later by selecting the Not Numbered option (shown below). Click the OK button to confirm your configuration and generate the table map. Once the tables are generated, each table can be modified by clicking the Edit action button, and then clicking the table which you wish to edit. For more information about editing tables, see the Use Action Buttons section above.

•Click on the Edit button;
•Then click on the table you wish to use and complete the Table Map Object Details form by assigning a table number etc.
Important: Only the tables that you assign a table number to will be saved.
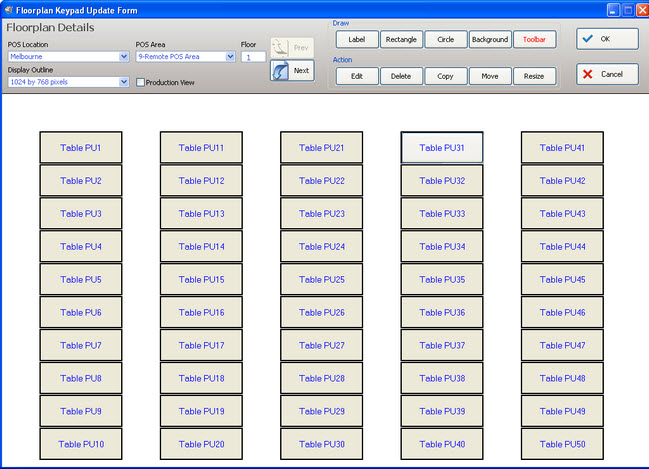
Delivery Module - Pick Up Keypad
This keypad can be used to take 'pick up' orders. All tables will have the 'PU' prefix ahead of the table number (eg. Table PU12, Table PU13 etc.)
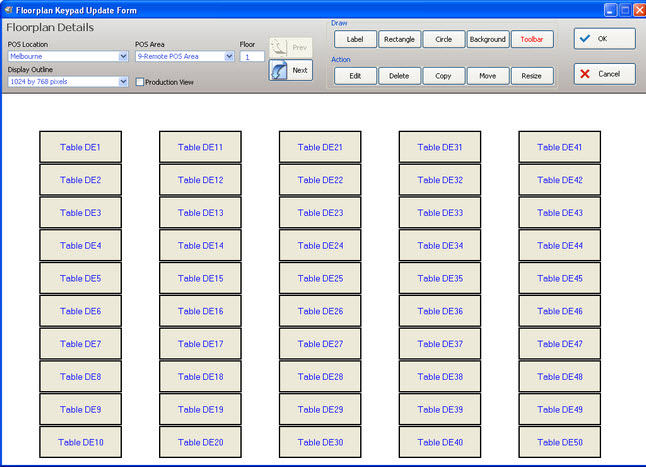
Delivery Module - Delivery Keypad
This keypad can be used to take orders to be delivered. All tables will have the 'DE' prefix ahead of the table number (eg. Table DE12, Table DE13 etc.)
|
•Click on the Background button.
•To select a background image click on Set and then select the background image.
•If you wish to use a default background image, click on the Toolbar button and choose from one of the images found in the Flooring tab.
Note: To remove an existing Background click on Clear.
|
Floorplans for Legacy POS can also be edited on the fly at the FOH by POS Staff who have been granted the Edit Graphical Table Map privilege. This topic is covered in the FOH > Floorplans section.
|
See Also: For more information about assigning staff privileges, see section POS Staff Details > Privileges.
|
|
The Floorplan Details screen will be displayed:
•Use the drop down menu to choose the POS Location this floorplan is for.
•Use the drop down menu to choose the correct POS Area.
•POS Area Section - Table objects can be assigned to a POS Area Section, so that sales entered on the table are tracked and reported as part of that Section. This filter can be used to display only the tables that have been assigned to the selected Section, or to display only tables that have not been assigned to a Section (by selecting <None>), or to display all tables (by selecting <All>).
NOTE: The POS Area Section filter must be set to <All> before you can create new objects or save changes to the Floorplan (by pressing OK).
•Select the Floor. Each POS area can have floorplans for a number of floors. The Previous Floor and Next Floor buttons are used to navigate between floors.
Options available from the Floorplan Keypad Update form are described below:
OK - Saves and closes the Floorplan Keypad Update form.
Cancel - closes the Floorplan Keypad Update from without saving.
Save - saves the changes to the Product Keypad Details form either since it was opened, or since the last save.
Copy Floor - Copies the entire contents of the current floor, including all tables, objects and background.
Paste Floor - Will paste the previously copied floor onto the current floor
If the current floor already contains objects - you will be prompted to REPLACE the existing floor with the copied data.
If the current floor is BLANK, but another floor for this location contains objects, the floor will be copied with table numbers prefixed to ensure there will be no conflicts (eg. Table 1_5, Table 1_6 etc). The tables will then need to be renamed.
If the current AND all subsequent floors for the location are BLANK, the floor will be copied with the table numbers unchanged and no further adjustments will be required.
Clear Floor - Clears the entire contents of the current floor, including all tables, objects and background.
The Floorplan Keypad programming space is presented with a grid background. This is to assist with locating and aligning floorplan elements.
You will add floorplan elements to your floorplan using the drawing toolbar or right click menu.
Once a floorplan button is drawn, the Table Map Object Details form is presented so you can configure the new object or table.
If you double click on an existing object or table the Table Map Object Details form is presented for you to view or change the object details.
The drawing toolbar provides the tools to add elements to your floorplan.

Actions

|
This button is active by default when opening the Floorplan Keypad Details form. This tool will select any object that you click.
|
|
Use this tool to select objects by drawing a rectangle - any object which has at least one handle within the drawn territory will be selected.
Alternatively, you can hold down the Ctrl key while clicking on objects to multi-select.
|
|
Use this tool to Delete any object currently selected.
|
Create Objects
|
Use this tool to create a label. A label allows you to create text on the floorplan. Once drawn the label can be resized by dragging any handle
|
|
Use this tool to draw a square. Once drawn the square can be resized by dragging any handle.
|
|
Use this tool to draw a circle. Once drawn the circle can be resized by dragging any handle.
|

|
Use this tool to set the background for the floor. From the pop up menu you can:
•Use Set Image to choose a file to apply as the background image.
•Use Set Colour to select a colour to be applied to the background.
•Use Clear to remove any background already applied.
•Use Cancel to exit the Background menu. |
|
Use this tool to display the Table Map Object Toolbar and insert pre-set images for both tables and objects.
|
Colours
Use the buttons in the Colours section to apply colour selections to the object.

|
This tool will allow you to select a colour to be applied as either background (button shape) or text colour.
|

|
The eyedropper tool allow you to select the colour you want to apply by clicking on it.
|

|
The fill with colour tool will apply the colour selected to the object you next click on.
|
Alignment
The tools in the alignment section will assist you to create a visually pleasing keypad layout.
Select multiple objects then use the tools to:

|
Align Left
|

|
Align Right
|

|
Align Top
|

|
Align Bottom
|

|
Centre Middles Horizontally
|

|
Centre Middles Vertically
|

|
Centre Objects Horizontally
|

|
Centre Objects Vertically
|
Button Size
The tools in the button size section will also assist with creating a visually pleasing keypad layout.
Select multiple objects then use the tools to:

|
Make the same width
|

|
Make the same height
|

|
Make the same size
|
Floor Setup.
The settings button can be used to display the Settings Form where you can adjust the grid and colour selection details.

Here you can adjust the:
•Grid Size
•Grid Colour
•Grid Type
- line
- dot
- circle
- cross
and choose to:
•Show grid lines
•Snap objects to grid
The Selection Colour shows the current colour selection and you can change it by clicking on the colour block.
You can also adjust the Selection Transparency by clicking on the up and down arrows.
|
If you right click on any object on the keypad you will presented with a menu to further assist with creating your keypad.

Edit [button text] - This option will open the Table Map Object Details form for you to edit the content of the button.
Swap - Choose this option then click on another object: the content of the buttons will be swapped.
Copy - Choose this option to copy the content of the object.
Paste - Choose this option to paste previously copied content to this object.
Delete - Choose this option to delete the object from the floorplan.
Format - If multiple objects are selected, this menu item will offer
* Align (Lefts, Centres, Rights, Tops, Middles, Bottoms)
* Make Same Size (Width, Heights, Both)
* Centre (Horizontally, Vertically)
Duplicate - When you choose this option the object will be duplicated. Move to an empty space on the keypad and click to install. You will then be presented with the Table Map Object Details form to create the content of the object.
Refresh - Refresh the floorplan.
Grid Setup - Choosing this option will display the Settings Form.
|
|
At the terminal: when unpaid items are saved to a table number, the name/number of the table will appear in RED on the table map, highlighting which tables are still ‘open’. When a table requests their bill and it is printed, the name/number of the table will appear in YELLOW on the table map, highlighting which tables are soon to be vacated.
|
See Also:
Floorplans are enabled or disabled on a terminal by terminal basis. To enable a table floorplan on a terminal, tick the Enable Table Floorplan setting from the POS Terminal Details form. If this setting remains disabled, this POS terminal will skip directly to the Product Keypad upon user log in.
Polygon POS Management > Keypads Overview
Getting Started with Polygon POS Management
Using Polygon POS Management
|