You can access all of the sales and revenue data from the BOH in much the same way as you might do from any other device (e.g. a cash register), on a day to day basis. When you reset a POS terminal, a Z-reset file is created which needs to be loaded into your Polygon POS Management back-of-house program. At this point you can view, adjust and process your sales data. This is done from the POS Revenue Processing form.
From Polygon POS Management, Click the Revenue Download icon on the toolbar, or, Select Sales from the Main Menu and then select POS Revenue Processing
|
Step 1
Select the POS Location and POS Area
Step 2
Click on the Get Sales Files from POS Network button to download the sales files. FTP (remote internet) users will always need to click on the Get Sales from POS Network button to access Till Reset files. For LAN based configurations, the reset files will be automatically available when you click on Revenue Download, providing that the Polygon POS Management PC is on the same network as the master POS terminal and the master POS terminal is switched on.
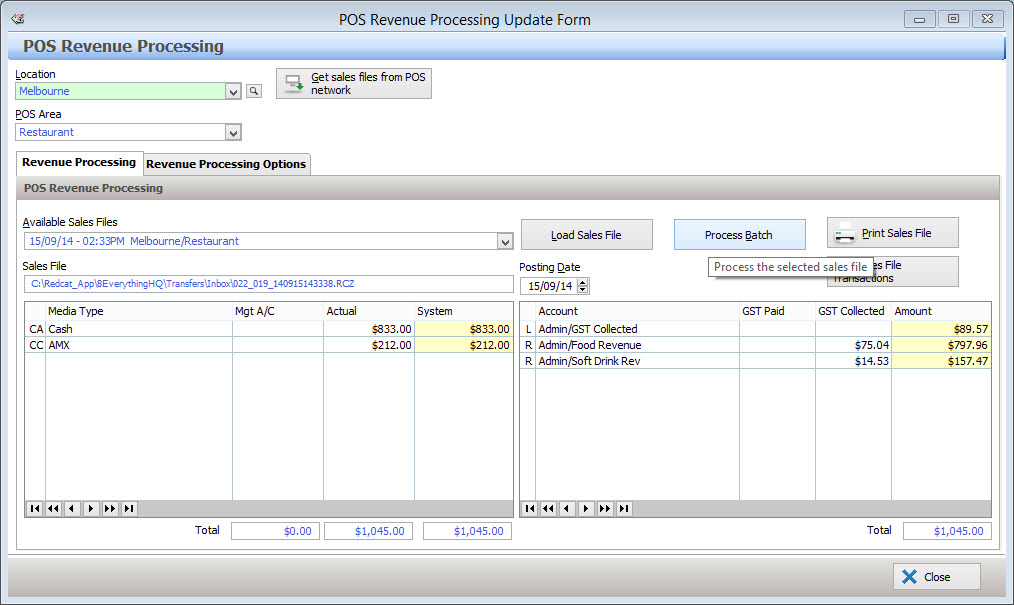
Step 3
You may select the date and time of the Till Reset you wish to commit. The pull down menu attached to the Till reset box will show all unprocessed data. You then select the ‘Load Sales File’ button to display this data on the screen.
Note: The posting date will automatically default to the same date as the Sales File, however it can be modified if necessary.
The amounts in the Z-Read and Revenue Accounts columns should be the same. Note that the system automatically assigns the revenue amounts to the revenue accounts specified for each PLU, therefore manual intervention is rarely required when processing this screen.
However, should you need to modify the media type details (eg. Cash) then you can do so by double-clicking on the media type. Note that client and management account figures cannot be altered as these are read-only. Furthermore, there are also minimum values for each media type.
Note: It is not advisable to edit the media figures at this point unless a definitive error has been made in the system figure such as an ‘over-ring’. Cash media should be adjusted at the time of Reset by entering the ‘Actual’ figure, and errors on the till should be rectified before resetting, by voiding the relevant sales or sale items.
If you do alter media type details, you need to balance both sides of the equation. This will involve selecting (double click) the revenue media type and pressing the '=' button. This process will need to be repeated until there is no longer a figure in the 'Out of Balance' field.This is necessary because GST inclusive accounts have an automatic GST calculation which is applied to the total revenue per account.
See Also: Global System Settings about altering system or actual amounts.
|
Step 4
Check the Stock and Revenue posting options. The Post Revenue and Post Stock options are available from the Revenue Processing Options tab. If you have Polygon Back Office, the Post Revenue tick box needs to be ticked in order to post revenue data to the general ledger. If you use the Polygon Inventory add on module, the Post Stock tick box should be ticked in order to post stock usage data to Polygon Inventory.
See section Polygon Inventory Introduction for more information about Polygon Inventory.
Step 5
From the Revenue Processing tab, click on the Process Selected File button to commit the Sales File to the database.
There are a number of Application Settings which effect how Sales Reset Files are processed including the option to automatically generate a PDF copy of the Z-Report and to automatically print a copy of the Z-Report when a sales reset is processed.
See Also: Polygon POS Management Application Settings > Z-Read General and Polygon POS Management Application Settings > Z-Read Sales Reports
To Print - Click on the Print icon to print the Z-Reset report. Nominate whether you also want the extended section and/or the revenue analysis section included. This will generate a Z-Report which can be saved, printed or converted to CSV format which can be loaded into spreadsheet programs.
The additional posting options are available from this tab are listed below. Auto-close sales download status window when done This setting will default to be enabled. It automatically closes the download status window after processing a sales reset.
Enable batch mode processing Rather than load, check and then manually process your POS resets, Polygon POS Management offers the option of automatically loading, printing and processing all available POS resets, at once. This may save considerable processing time for businesses with many locations and POS areas. After enabling this option you will notice that the Process Sales button changes to read Process Batch. All available sales resets will be processed if you choose to Process Batch. All available sales resets will be processed if you choose to Process Batch. Remember to check the status of the Post Revenue and Post Stock tick boxes. These tick boxes are described below.
Post Revenue & Post Stock If you have the Polygon Back Office module these options will be available. They allow you to specify how the sales data committed into the BOH system. If you have Polygon Back Office, the Post Revenue tick box needs to be ticked in order to post revenue data to the general ledger. If you use the Polygon Inventory add on module, the Post Stock tick box should be ticked in order to post stock usage data to Polygon Inventory.You may choose to un-tick the Post Revenue and Post Stock options in which case, only the sales figures will be posted to Polygon Back Office. This will effectively delete the Stock and Revenue data before updating the Polygon Back Office ledgers and accounts.
|

If an error is found in a sales reset it will not be processed and an additional Error log tab will be shown on the POS Revenue Processing form. This tab contains additional information about the error including the affected sales file, which line the error occurs on and the type of error found. Clicking the Move file to exceptions folder button transfers the sales reset file to a different folder and prevents the error from being reported multiple times. If an error is shown on the POS Revenue Errors tab it is recommended that you click the Move file to exceptions folder button and then contact Redcat support by phone on 1300 4REDCAT, or by email at support@redcat.com.au for additional assistance. Note: A valid Redcat software support contract is required for Redcat telephone/email support.
|
See Also:
Polygon POS Management > Viewing the Processed Sales Log
Forcing a Sales Reset At The End of Each Trading Day
Polygon POS Management > Location Settings > Z-Read General
FOH > Closing Procedure - Reconciling & Resetting The Terminal
Getting Started with Polygon POS Management