Production Printers print production dockets for staff to prepare food or drinks once they are ordered. A production printer can be configured to print only a selection of categories. This is called Category printing and is also configured from this form. For example a kitchen production printer may only print food related categories and a bar printer may only print beverage related categories. This form is accessed from the POS Peripheral Details form and can be used to create or change production printers.
The following is an example of a completed POS Peripheral update form for a Production printer:

The Production Printer Peripheral Details form is divided into two tabs General and Category Printing. These tabs are described below:
General Device Type This option is only changeable when creating new peripherals. Select Production Printer here.
Enabled This setting will automatically be selected and should only be un-ticked if a peripheral is temporarily out of use.
Port Select the port on the terminal that the production printer will be connected to. Printers may be attached to a COM (serial) port, an LPT (parallel) port or a TCP (network device) port. Printers which have been configured on another terminal can be shared across the network. USB ports can also be used when they emulate a serial connection. When a USB printer is in use, specify the COM port which it is emulating. •For serial printers a COM port will need to be selected (often this is COM2). •For parallel printers a LPT port will need to be selected (often this is LPT2). •For Ethernet (TCP) printers, a TCP port will need to be selected. If you are choosing to use TCP printers, you will need to contact your distributor to ensure that physical printer is correctly configured for TCP recognition. •To share a printer which has been setup on another POS Terminal select Network. This will display a list of printers which have been added to other terminals. Select the printer you wish to share and then click Select. Click here for more information about sharing peripherals across the network. To print through a printer which is attached to a terminal in a different POS area, you need to enable cross area printing. See section Location System Settings > POS Terminal Settings > Cross Area Printing for instructions on enabling cross area printing. Note: If a physical printer will be used as a receipt printer and a production printer. When setting up the printers, both printers MUST use the same port e.g Com2. Similarly, if you wish to use one physical printer as two production printers, that is, produce one docket for bar items, and a separate docket for kitchen item, you will need to set the printer up twice, using the actual physical com port, and then a virtual com port that is not physically available on the terminal (E.g. com 6, com 8 etc). This printer port then needs to be redirected to the actual ‘real’ com port in the FOH Wintill application. Refer to the section on FOH System Settings > Printer Redirection for instructions explaining how to setup printer redirection at the FOH.
IP Address & IP Port For network printers an IP Address and IP Port must be entered. The default IP Port is 9100. These options will not be available unless the Port setting is assigned to TCP.
Device Model This is where the specific model or type of printer is entered in to the system. Use the 'Generic Printer' option the model or type of printer is unknown.
Device Name This is where you give the device a unique name that identifies it within the system. For example, ‘Kitchen’ or ‘Bar’.
Printer Set Optionally, you can select a Printer Set from the drop-down list available. If a Printer Set is selected, jobs to this production printer will be filtered according to the Sale Types and Printer Categories within the Printer Set.
Enable DSR Flow Control This setting is automatically applied when certain types of printers (device models) are selected. Please note that printers which require DSR Flow Control will also require a printer cable with the pin out configuration necessary for DTR/DSR flow control.
Device Timeout If the setting Enable DSR Flow Control is enabled, the Device Timeout will automatically default to 7 seconds.
Report Settings Number of copies If you require more than one copy you can set the number of copies to be printed from this printer.
Header offset This refers to the number of lines left before the header on the production docket.
Footer offset This refers to the number of lines left after the footer on the production docket.
Compress report This setting will automatically collate like PLUs on the production docket. For example, if a sale contains more than one instance of the same PLU it will appear on the docket as “3 x Roast Lamb”. If dockets are printed uncompressed it will appear as “1 x Roast Lamb, 1 x Roast Lamb, 1 x Roast Lamb” on three separate lines. If the Compress Instructions option is also enabled, any like instructions will also be compressed. For example, 1 x Latte + Skim, 1 x Latte + Skim, 1 x Latte + Soy will be collated into 3 x Latte with 2 x Skim and 1 x Soy.
Print in PLU Class order This setting will print items on the production docket in PLU Class order (see section PLU Class Overview ). For example, ‘Entrees’ will be printed ahead of ‘Mains’. If the function is not turned on the production docket will print items in the order that they were entered on the terminal.
Print the Sale ID on the production docket Every sale has a unique Sale ID that is printed on the receipt printer. This setting will print this Sale ID on the production docket so that the two can be matched up. This is useful in some take-away businesses that operate in an ‘order, pay and then wait for your number to be called’ way.
Disable self-production printing If you select this option, production dockets will not be printed for sales which are entered on the terminal to which this printer is attached. For example, you may have a Bar production printer attached to a POS Terminal at the bar. You want sales entered at other terminals to produce a production docket for the bar attendant, but do not want a production docket to issue when the bar attendant enters a beverage sale using the bar POS Terminal.
Print self-resetting folios This option prints the line “Order # 1” etc on the top of each production docket. The numbers will increase with each docket to a predefined upper limit and will then reset and start from 1.
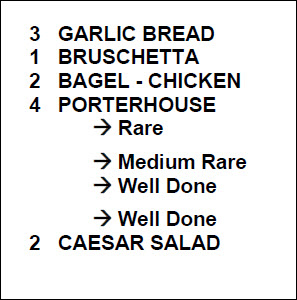
Split production print jobs Enabling this option splits each individual item from one order, onto separate production dockets. That is, every individual item that is ordered is printed on a separate production docket.
For example, if someone orders two Berry Smoothies, rather than printing the 2 Berry Smoothies on one production docket, this option will print 1 Berry Smoothie on docket ‘1 of 2’, and 1 Berry Smoothie on docket ‘2 of 2’. This may be useful if you plan to attach the production docket to each individual product.
|
If the Device Model chosen is a label printer rather than a continuous roll printer, there are additonal configuration options available. These are detailed below.
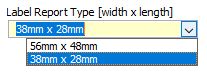
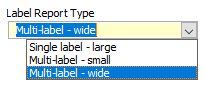
Label Report Type The selection made here will determine the available real estate of the label so that the system can compile the label correctly. The type of label printer selected will determine the options available in the drop down list. The options will be either:
Reprint header on continued labels If selected, this option will have the header potion of the docket of the first label reprinted on any subsequent labels that pertain to the same item.
Print label inverted If selected, this option will instruct the system to print the label upside down. This may be required if you have branded labels to have the pre-printed portion with the correct orientation. You may also choose to use this to make the transfer from label backing to product easier.
Print instructions in 2 columns Designed for use with multi-label - wide format labels and the ZD410/411 printer, this setting will have the instructions listed under the parent item in two columns. The instruction text will be prefixed with an * and truncated at 12 characters. A maximum of eight (8) instructions will be printed on the initial label, and a maximum of twelve (12) on subsequent labels (if printing only the shortened saletype).
Print shortened saletype This setting is used if you want to remove the sale type header from the label, leaving only the order number (which includes the sale type prefix, for example: TA015, PU042, DE001) to maximise the space available for instructions.
|

Category printing refers to the assignment of categories to a particular printer. In other words, you determine which items will print at which printer. If only one production printer is being used, then there may be items that you may not want to print. On the other hand, if more than one production printer is being used then you may wish to designate certain categories to each printer.
For example, if there is a production printer in the kitchen and a production printer at the bar then you might assign all the food categories to the ‘Kitchen’ printer and all the beverages to the ‘Bar’ printer.
For more information, see section Polygon POS Management > Category Printing
Note: If a Printer Set is assigned to this printer, the Printer Categories assignment in the Printer Set will override any category assignment applied here.
|
See Also:
Polygon POS Management > Category Printing
Polygon POS Management > Sharing Peripherals
Polygon POS Management > POS Peripheral Details
Polygon POS Management > POS Network File