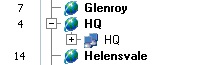
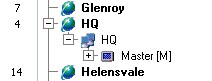
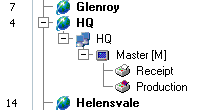
The POS Network section of Polygon POS Management is where information is recorded which governs how your physical POS system will operate. It contains hardware configuration details for each location, the areas within those locations. The locations, areas, terminals and peripherals are displayed in the hardware tree with a summary of their configuration. Items can be created, edited and removed from the hardware tree by using the options available from the POS Network File. See below for an example image of the hardware tree and a key describing each icon.
From Polygon POS Management, Click the POS Network button on the toolbar, or, Select the POS Network from the main menu and then select POS Network
|
A completed hardware tree will look similar to this:

The following table identifies each icon found in the hardware tree.
Icon |
Meaning |
|
Represents a Location |
|
Represents an Area |
|
Represents a POS Terminal |
|
Represents a Receipt Printer peripheral |
|
Represents a Production Printer peripheral |
|
Represents a Cash Draw peripheral |
|
Represents a Production Display peripheral |
|
Represents a Customer Display peripheral |
|
Represents an EFTPOS Pinpad peripheral |
|
Represents a Weight Scale peripheral |
|
Represents a Promo Player Peripheral |
|
Represents a Kitchen Management System (KMS) Role |
|
Branches - An item which branches off another item indicates it belongs the item it branches from. Click a plus symbol to view items within a branch, or click the minus symbol to hide items within a branch. |
The items shown in the hardware tree are described in more detail below:
POS Locations are used to separate your business into physical operational areas. For example, you may have two separate restaurants, each in different suburbs of the same city. Canberra City may be the name of one location, and the other could be Tuggeranong. Locations facilitate the ease with which data is sent to your terminal network, and how trading data is retrieved from them.
Creating POS Locations - Click the New button, then select POS Location. This will load the POS Location Details form where additional details about the location are entered.
|
POS Areas are used to separate the POS Terminals in within each POS Location into logical operational areas. For example, separating the Restaurant from the Bistro, or the Bar from the Bottle Shop.
It also facilitates easy reconciliation of revenue figures as data for each area is loaded and committed separately. The area file also serves to identify which of the terminals will be designated as the ‘Master’ terminal (and if you have two or more terminals, which terminal you wish to receive the backup files from the Master). If your system hardware includes handheld stations, it also records which terminal the hand-helds emulate for printing characteristics.
If your system includes an interface to ResPAK, the required mapping is entered per POS Area. Instructions regarding the detail contained in both the headers and footers of receipts, and the footers of production dockets are entered by area. Trading Sitting periods are also programmed per POS Area.
Creating Areas - Select the location which the Area will belong to, then click the New button, then select POS Area. This will load the POS Area Details form where additional details about the new area are entered. Because each area must be assigned a master terminal, once an area has been created a POS terminal must also be added to this area (for instructions explaining how to create a POS Terminal see the Creating POS Terminals section below), then the area should be re-opened and POS Area Master Terminal should be assigned from the General Tab.
|
POS Terminals are the physical computers used to process POS transactions. The Terminals File controls all terminals on your network. It contains all the information required to determine how each terminal operates. A POS terminal must belong to a POS area in a POS Location.
Creating POS Terminals - Select the Area which the POS Terminal will belong to, then click the New button, then select POS Terminal. This will load the POS Terminal Details form where additional details about the terminal are entered.
|
Peripherals are separate devices which are attached to your POS Terminals such as Printers, Cash Draws, Production Displays, Customer Displays, EFT Pinpads and Weight Scales, Promo Players Monitors and Kitchen Management System Monitors. Each peripheral must belong to a terminal.
Creating Peripherals - Select the Terminal which the Peripheral will belong to, then click the New button, then select Peripheral. This will load the POS Peripheral Details form where additional details about the peripheral are entered.
|
To change an item listed in the Hardware Tree, highlight the item and click the Change button. •If the selected item is a Location, the POS Location Details form will be loaded; •If the selected item is an Area, the POS Area Details form will be loaded; •If the selected item is a Terminal the POS Terminal Details form will be loaded; •If the selected item is a Peripheral the Peripheral Details form will be loaded. These forms enable you to make modifications to the selected item.
|
To delete an item from the Hardware Tree, highlight the item to delete and then click the Delete button. Items with dependencies (other items which belong to this item e.g if a terminal has a printer, or if an area has a terminal) can't be deleted until the dependencies have first been deleted.
|
Each POS Location stores its own location system settings which can be configured separately. To access a location's system settings, highlight the POS Location then right click on the hardware tree and select POS Location Settings from the pop-up menu. This will load the POS Location Settings Form which allows you to edit the Location Settings for the selected location.
See Also: Polygon POS Management > Global Settings
|
The hardware tree can be filtered with the following options: •View - Locations can be set to Active or Inactive. The POS Network file can filter the hardware tree to view only Active, Inactive or All locations by selecting the Active status from the View list; •Show device ports - Ticking this box will show which ports each peripheral is attached to in the Hardware Tree; •Show computer names - This will show the computer name of each terminal in the Hardware Tree; •Show device models - The model or type of each Receipt Printer, Production Printer or Customer Display will be displayed in the Hardware Tree.
|
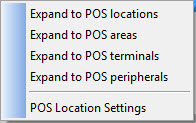
The expand function allows you to quickly expand or collapse the hardware tree. This is done by the right-clicking (with the mouse) on the hardware tree. The the Expand menu will be displayed.
There are four different levels for viewing the system hardware: •Selecting Expand to POS Locations will show only POS locations in the hardware tree.
•Selecting Expand to POS Areas will show POS Locations and POS areas in the hardware tree.
•Selecting Expand to POS Terminals will show POS Locations, POS Areas and POS Terminals in the hardware tree.
•Selecting Expand to POS Peripherals will show POS Locations, POS Areas, POS Terminals and Peripherals in the hardware tree.
|
•Find - You can search for a POS location either by Location Name or Store ID (Locatioan Number). To do this, type part of, or all of the POS Location name or number into the Find Location box. The system will highlight the first listed item to contain this string in its name or number. Note: The search only applies to currently displayed Locations •Find Next - use the Find Next button (the right pointing arrow next to the Find Location field) to advance to the next match found, and continue to scroll through all matches found for the Find criteria.
|

See Also:
Polygon POS Management > POS Location Settings
Polygon POS Management > POS Location Details
Polygon POS Management > POS Area Details
Polygon POS Management > POS Peripheral Details
Polygon POS Management > POS Terminal Details
Getting Started with Polygon POS Management