There are various ‘system’ keys which may be incorporated into your product keypad design. System keys allow you to add extra functions to the product keypad including discounts and surcharges. Each of these key types are described below:
From Polygon POS Management, Select the Product Keypads button from the toolbar, then either, •Click the New button to create a new product keypad, or, •Highlight an existing Product Keypad and click the Change button to modify the selected keypad, Then click on a blank button to add a new product keypad button, This will display the Keypad Button Details form. |

To create a system key, click the Other button from the Keypad Button Details form.

To use a button type, highlight the type and then click the Select button.
Click on a button type below for more information:
This button will allow the user to manually enter the barcode number of a PLU using the numerical keypad, and the system will display that PLU. Note: For this key to work the barcode number of the PLU must be present in the Barcode field of the PLU Update Form (See section PLU Item Details > Other Items).
|
|
This button allows a user to broadcast a message to all or any of the production printers on your system. For example, if the customers sitting at Table 6 ask to be moved to Table 10, and the orders for their drinks and meals have already been entered, the kitchen and bar staff will need to know that the product now needs to be delivered to Table 10 instead.
|
This button allows easy access to the clear function when a wrong entry is made. It will clear the last item in the list of sale items. Note: If an item further up the list needs to be cleared, the user will need to highlight the item then click the ‘C’ button above the numeric keypad.
|
Allows the user to clear an entire sale from the Product Keypad without the need to enter into the pay screen where the Clear Sale function normally resides.
|
|
Allows direct access to the Clients File for Account Payments, where an account balance can be provided to the client and payments can be made by any media. To use this feature, Client Accounts must be added into the Polygon POS Management > Client/Member Accounts File and linked to Client Records in the Polygon Back Office > Clients File.
|
This key allows the user to ‘credit back’ an item for returns purposes. It will effectively take the item value off the bill and ensure that the stock level is not reduced. The button will credit the item entered immediately before, and adjusts the item price to a negative value (displayed in brackets). To use this key, enter the sale item from the keypad, then press ‘Credit Item’ button.
|
This key is available for use where items sold have GST Free status if sold ‘take away’ and GST Inc status if sold ‘dine in’. The PLU should be programmed as a GST Free item, and when this Dine In button is pressed, the GST status on all PLUs in the following sale will change to GST Inc.
|
You may either program a set percentage discount or leave the discount as open, in which case the system will prompt you for a percentage each time the key is used. Name the keypad button appropriately to reflect its function. For example, this may be a 20% discount button which you call ‘Staff Discount’ and use for staff meals. In the ‘Apply to’ field you would select ‘Subtotal’. Note: In the Account field you need to assign the revenue account to which this discount will apply – discounts are recorded as negative revenue in this revenue account.
This key may be used to apply a discount of x% to either: •The last item sold; •All new items; •Subtotal (All currently shown items); •All food items; •Last item including instructions; •Selected item; •Selected item including instructions; •A PLU Class; Select one of these options from the Apply to list box
|
This key will discount the total sale by $x. You may either program a set dollar value (eg. $10) or leave the discount amount as open, in which case the system will prompt you for the $ value each time the key is used. You need to assign the revenue account to which this discount will apply. Discounts are recorded as negative revenue in this account.
|
Allows the user to apply a DSC to the sale. You may choose to: •enter a value to be applied as a percentage •enter a value to be applied as currency •program this button with an open value - the user at POS will be able to enter a value to be applied as either currency or percentage.
You can learn more about Discretionary Service Charges here.
|
|
This button is used in conjunction with the Cash Drawer Management feature. It allows a assignment of each cash drawer to a specific staff member at the beginning of a shift, and the staff member to be logged off when the drawer is finalised at the end of a shift. Only staff members who are assigned the Cash Drawer Manager privilege can use this button. For more information about this feature, see section Front of House > Cash Drawer Management - Log On & Off
|
This setting is only available if you are using an EMS third-party interface. It allows you to look up the balance for a particular member.
|
This button allows you to manually enter a member ID. This can be helpful when card readers are down or when a member has lost their card but knows their card number.
|
This key will execute a third party software application from the POS Terminal. You enter the command path for the desired application in the value textbox. For example, to open the Windows Calculator the command path would be C:\WINDOWS\system32\calc.exe.
|
Fast Finaliser keys are used to streamline processes and increase the speed in which a sale can be finalised. There are several different types of fast finaliser keys. However, the most commonly used are those that represent different cash denominations (eg. $50 note). Several fast finaliser keys are often assigned to the one keypad.
Available Fast Finaliser Button Types are: •Full Cash Amount - Provides a button which finalises the total of the sale to cash and assumes that correct or exact money is received, that is, no change is calculated for the user. •Denomination - Choosing $100, $50, $20, $10 or $5 provides a button which enters that denomination as the amount of cash received. Change is calculated and displayed until the next sale. They keypad button will display a graphic of the appropriate bill: •Open Cash Amount - Provides a button which prompts for the actual cash tendered amount to be entered. In other words, the user enters the exact amount they are given. Change is calculated and displayed until the next sale. •Open Mgt a/c Amount - Provides a button which finalises the item to a pre determined management account. The button should be named accordingly. •Full e-Gift Card – Provides button that will finalise a sale to an e-Gift Card. •Open e-Gift Card – Allows you to finalise a specified amount of a sale to an e-Gift Card and then finalise the remainder of the sale to any other media (available for Legacy POS only) •Full Hybrid Card – Provides button that will finalise a sale to a Hybrid Card •Open Hybrid Card - Allows you to finalise a specified amount of a sale to an Hybrid Card and then finalise the remainder of the sale to any other media (available for Legacy POS only) •Integrated EFTPOS - will finalise the full amount of the sale using an integrated EFTPOS pinpad.This button is used to speed up EFT payments by bypassing the payment screen. Clicking this button will start EFT payment process for the current order. You will be prompted to swipe the EFT card and follow the EFT payment process. •Non-integrated Merchant Card - will finalise the full amount of the sale to the merchant card assigned to the button. For partner stores, this button will try to match name of the card used to create the button to a merchant card existing in the partner BOH database. If no match exists it will record the payment against whichever merhcant card is tagged as the 'default merchant account'. If no default is set, it will record against the system 'EFT Media' system record. See: Merchant Card Details for more information. •EFTPOS Target Role - will issue the integrated EFTPOS payment request the the Adyen pinpad on the network assigned to this specific peripheral role. See: Peripheral Roles and EFT Pinpad Peripheral for more details. •EFTPOS Lookup Role - will provide a list of all Adyen pinpads on the network with a peripheral role assigned for the POS Staff member to select the desired pinpad. See: Peripheral Roles and EFT Pinpad Peripheral for more details. •Dynamic User Selection - This fast finaliser mode allows the user to dynamically select the cash fast finaliser option at the time of sale. A finaliser pop-up will display at the terminal as follows, allowing staff to check their entry before processing:
|

This button only applies to users who have the PMS Third Party System Interface. This button will allow you to identify the details associated with a particular folio number.
|
For LEGACY POS: This button will cause all of the items in the sale to be recorded and reported as GST Free items regardless of how the PLUs were programmed. It will not change the $ value of the items to remove the amount of the tax, it will simply record them as GST Free for THIS sale. Please note: This button must be used AFTER all the items for the sale have been entered.
For POLYGON POS: This button will instruct the POS to ignore any tax code assigned to the Sale Type for the selected item, and instead use the tax code (GST/VAT/Tax Inclusive or GST/VAT/TAX Free) assigned to the PLU. It will not change the amount of the item selected.
|
|
This button allows the user to hold a sale in the middle of a transaction, without sending the items to be printed for production. This may be used to hold one sale while another customer is served or transaction processed. It is designed for Over The Counter sales only. The sale can be recalled later by clicking a Recall Held Sale Key on the product keypad. This key is described below.
|
This button allows the user to attach an instruction message to the item immediately above it, and the instruction is then printed with that item on the appropriate production printer. An onscreen keyboard will be displayed when this button is used, so the instruction can be as specific as necessary.
|
This key will allow you to toggle between different keypads. For example, while using the Food keypad this key could change the display to the Wine List keypad. All keypads that have been created will be available for selection when choosing the Keypad Change function. It is a good idea to link all main terminal keypads to each other, and all hand held terminal keypads to each other by using Keypad Change buttons.
|
This button will allow the user to transfer an item from one table to another when the Table Transfer Mode selected in the POS Location Settings is Product Keypad Based.
|
This button is for use with Position Ordering functionality and this feature must be enabled in the POS Location Settings. It will search the current table for existing Seat number and then add the next sequential seat number.
|
This button will allow the user to manually enter a known PLU number and the system will display that PLU as a sale item without needing a specific keypad button.
|
This button, when pressed immediately before a food item, will re-assign the item to be grouped into a different class. For example, if a customer orders from the entrée menu for their main meal, you can select Serve as Main and then the entrée dish. It will then be printed with the other mains under the class heading ‘Mains’. Also, the prefixes E; M; or D; for Entrée, Main or Dessert will be printed in front of the modified items at production and in the sale window.
|
This button will allow the POS User to search the PLU file for a required item. This can be useful when an extensive wine list means it isn't practical to scan through pages of keypad buttons looking for a specific wine. •PLU Name •PLU Category, or •PLU Class The POS User can then select the required item from the search results returned and the item will be added to the sale.
|
This button is used to specify one type of PLU out of many related options. For example, Small, Medium and Large PLU modifiers may be created and used to adjust the price and display name of a generalised item such as ‘Fries’. The PLU items must have this modifier selected in their PLU update form (see section PLU Item Details > Item Details). The modifiers are case sensitive within the PLU description and the name of the modifier, however the keypad button can be named differently. For example, if your modifiers are set up as Sml, Med, Lrg you may choose to change the Keypad Button Text to SMALL, MEDIUM, LARGE for ease of use. PLU names must begin with their PLU Modifier text. The three PLUs in this example would be called "Sml Fries", "Med Fries" and "Lrg Fries".
When selected before an item, the modifier will adjust the price of that item. When selected before a category, the modifier will cause the category pop-up to be filtered and display only PLUs of the selected size.
|
This button can be programmed as an upsize function and used to retrospectively change the size of the item just entered, adjusting the price accordingly. This will work as long as the ‘Item Size’ of each relevant PLU is specified in the PLU Update Form (see section PLU Item Details > Item Details). The keypad button should be named according to its function, for example: ‘Upsize Medium’ or ‘Upsize Large’.
|
This button facilitates the recording of petty cash taken from the till. You must assign an expense or cost account to the button, and choose the GST Type. It is recommended that you name the button to reflect which account has been assigned. It is an ‘open price’ button, and the amount entered will be deducted from the cash holding figure of the drawer.
|
|
This button allows you to finalise a sale using Loyalty points. The system will prompt the user to swipe a loyalty card after this button is selected.
|
|
This key may be programmed to allow a change in price level for either the next sale item, until the end of the current sale, or permanently (until changed again via another Price Level Change button). Price levels for PLUs are programmed within PLU update forms where Level 1 is generally the default level. There are 5 available price levels. A terminal may be set to sell at a particular price level. For example, a level change might be used to cater for a Happy Hour at the bar terminals, while the restaurant terminals remain on regular pricing.
Note: The active price level at the terminal is shown at all times at the bottom of the keypad display. For example, ‘Active Price Level: PL1p’ OR ‘Active Price Level: PL3a’, where p stands for permanent (has been manually set or is the default price level) and a stands for automatic (has been programmed for a time period). See section Polygon POS Management > Automatic Price Level Changes for information about automatic price level changes based on the time of day.
Select the price level change type from the Mode drop down list box. Options include Permanent, Next Item Only and Until the end of current transaction.
|
When this key is used the PLU sold immediately prior will be adjusted via discount or surcharge to a specified value (Target Price). If no Target Price is entered, the discount amount is ‘open’ and the value must be entered at the POS terminal. Note: This option requires the POS Staff who clicks the button, to have the POS user privilege "PLU Price Override". See section: Polygon POS Management > POS Staff Details > Privileges for more information about assigning staff privileges
|
This is an open amount key, whereby the price for the PLU selected will actually change to the net value entered by the user – it does assign the price change as a discount or surcharge. Note: This option requires the user to have the POS user privilege "PLU Price Override".
See section Polygon POS Management > POS Staff Details > Privileges for more information about assigning staff privileges
|
This option allows the user to enter a production message at any point of the sale, and the message will always appear at the top of all production dockets, regardless of the point at which it was entered in the sale.
The production header message has 3 modes; static text – where the button text will appear at the top of the production docket, dynamic alpha - which allows the user to type in a heading, or dynamic numeric – where a numeric keypad allows the user to enter a numeric heading.
Note: A dynamic alpha button may also be given a static value such as ‘NAME:’ which will then display the keyboard for entering the name and the heading will print as ‘NAME: John’.
|
This button is used to instruct the system to read from the Wedderburn Scales which are supported as a POS Terminal peripheral, for items which are sold by the kilo.
See section POS Network File > Peripherals for information about setting up POS Peripherals including Wedderburn Scales
|
This button is used in conjunction with the Hold Sale button (described above) to recall a held transaction. If only one transaction is on hold at the time it will be automatically recalled into the sale screen. If a number of sales are on hold, this button will bring up a list of the held sales from which the user can select. Note: Held sales are user specific, so the same user must log in to recall the sale with this button.
|
This button will recall the last sale entered on this terminal and display it on the screen. This is useful when the client asks for a receipt after the sale has been finalised. Note: If you choose to password protect this key, it will only be available to users who have the privilege ‘Edit Finalised Sales’, as the sale being recalled can be edited at this point.
See section Polygon POS Management > POS Staff Details > Privileges for more information about assigning staff privileges
|
|
You may specify the Sale Type required when programming the button. Alternatively, if you choose the Lookup List option, the POS users will be able to choose the required sale type from the list at POS. If you want to button to search for the oldest sale, regardless of the sale type choose the 'Any' option.
|
This button allows a staff member to open a table and re-order the same items as were entered the last time that table was opened (commonly named ‘Another Round’ on the keypad). When pressed, a pop-up will be displayed as follows, allowing staff to check the round that will be repeated and adjust if necessary:
|
This feature is available for users of the PMS external interface only. When clicked this button will request a balance enquiry for all active rooms from the PMS interface.
|
If you have multiple customer displays assigned to a POS Terminal (perhaps a Customer Facing Display physically connected and a Customer Ordering Display in each of two drive through lanes) this button will allow the POS user to choose the Customer Display to which any input from the POS will be sent.
|
This button is for use with Position Ordering functionality and this feature must be enabled in the POS Location Settings. It will present the Table Seat Keypad to allow selection of the relevant seat.
|
When pressed, this button will display the FOH Clients File from which a delivery client can be selected and an order placed against their name.
|
This button gives a staff member access to the PLU list, where available portions for items that may be limited in number can be set, thereby allowing the system to countdown these items. For example, the chef may have only 4 serves of Greek Lamb Salad left to sell. When level is set at 4, this number will be displayed on the Greek Lamb Salad keypad button, and will be reduced each time a serve is ordered. The button will appear as follows:
For this feature to work, staff members need to be granted the ‘Set POS PLU Levels’ privilege (see section POS Staff > POS User Accounts). To enable this feature, tick the ‘Enable PLU Level Tracking’ option in the POS Location Settings > PLU Level Tracking. Once you assign the ‘Set PLU POS Levels’ system key to a keypad the countdown feature can be accessed. The user will be prompted for their password to open the PLU file and adjust the levels of specific items.
To deny sale of items when the POS PLU Level reaches 0, tick the '"Deny Sales if PLU level tracking balance is zero" option the location POS Location Settings > PLU Level Tracking section.
See Also: See section FOH > Setting POS PLU Levels for information about using this feature at the FOH. See section POS Staff > POS User Accounts for more information about staff privileges.
|
|
This function allows you to program buttons which will tag a transaction with a particular Sale Type. The Lookup List option will open a window which shows all the possible sale types. Other options include None, Dine In, Take Away, Pick Up, Delivery, Drive-Through, Table Service or Web Ordering. These sale types will be displayed at the top of production dockets, and flow through to Sales by Sale Type reporting.
|
|
This function allows the user to manage a list of orders placed under a particular Sale Type. Pickup, Delivery and Drive through orders will need to be ‘managed’ as these sales are entered and saved, and then finalised at a later time eg: when the customer arrives to pay and collect. The Management window contains a list of only the transactions that have been tagged with the nominated sale type. These buttons are particularly useful for sale types: Drive Through, Pick Up and Delivery where orders are usually saved and then recalled later to process payment.
|
This button allows you to select from a number of ResPak commands regarding the activity at a seated table, which will send system messages to the ResPak server.
|
|
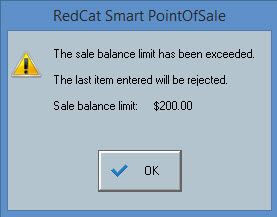
This key allows a staff member with the ‘Set Sale Balance Limit’ privilege to specify that the account for a certain table must not exceed a specific dollar value. This limit can be set at any time whilst the table is open. This limit can be adjusted or cleared if necessary, by pressing the ‘Set Sale Balance Limit’ button again; the figure entered previously will be displayed. The limit assigned to an open table can be viewed by accessing the Sales History. Scroll across to the far right column titled ‘Balance Limit’.
When a staff member enters a sale item and the Balance Limit is reached, the following message will be displayed at the terminal:
See section Polygon POS Management > POS Staff Details > Privileges for more information about assigning staff privileges See section FOH > Entering a Sale > Sales History for more information about using the Sales History
|
This key may be used to apply a surcharge. You may either program a set percentage (eg. 10%) or leave the surcharge as open, in which case the system will prompt you for a percentage each time the key is used. You need to assign the revenue account to which this surcharge will apply. Example of use may be Weekend or Public Holiday Surcharge.
A surcharge of x% can be applied to: •The last item sold; •All new items; •Subtotal (All currently shown items); •All food items; •Last item including instructions; •Selected item; •Selected item including instructions; •A PLU Class; Select one of these options from the Apply to list box.
|
This key may operate in one of two ways: 1. Default Mode - this will add a surcharge of $x.xx to the current sale. You may either program a set dollar value (eg. $7.50) or leave the surcharge amount as open (blank), in which case the system will prompt you for the $ value each time the key is used. You need to assign the revenue account to which this surcharge will apply. GST will apply to the surcharge of there are items in the sale to which GST applies. 2. Round to the nearest $1 - when applied, this surcharge will add the required amount to round the total of the sale UP to the nearest whole dollar. This function is most commonly used for collection of Charitable Donations and therefore the selection of a Liability ledger account is allowed. Should a liability account be selected for reporting these funds, the GST type Not Applicable will be applied. The round up value range is $0.01 to $1.00. eg: On a sale of $15.99 this function will apply a surcharge of $0.01 for the sale to total $16.00. On a sale of $15.45 this function will apply a surcharge of $0.55 for the sale to total $16.00. On a sale of $15.00 this function will apply a surcharge of $1.00 for the sale to total $16.00.
|
This button will take the sale display window of the terminal and enlarge it on the screen. This makes it easier to add, subtract or clear sale items as the buttons become larger. From the magnified sale you can also choose to Reprint the production dockets created by the sale. If an ingredient or an item with ingredients is selected, clicking the zoom item button will allow you to change the ingredients which are included in this order. Note: The Zoom Sale and Zoom Item functions are also available as part of the system functions at the top of the terminal screen. Therefore, this button will be most useful on a hand-held terminal keypad.
|
See Also:
Polygon POS Management > Product Keypad Button Details
Polygon POS Management > Product Keypads File
Polygon POS Management > Keypads Overview
Getting Started with Polygon POS Management